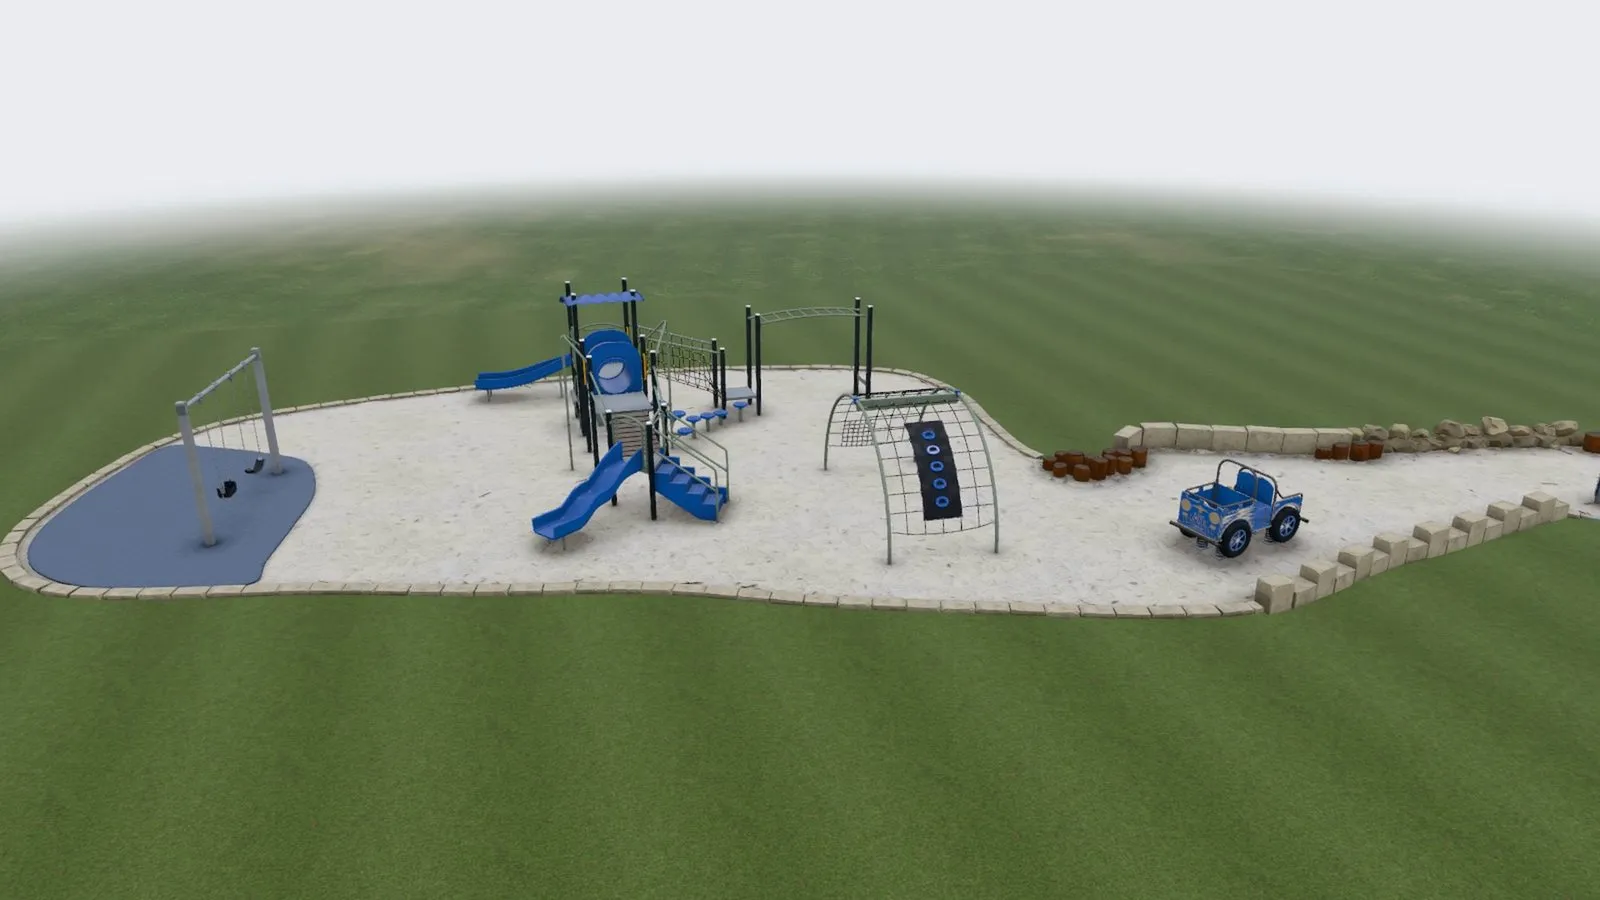
This playground isn’t a scan, and it isn’t a photo. An AI agent built it as parametric CAD, from forty photos I took on my phone. Every slide, chain and bolt is a named part you can actually work with.
Back in January
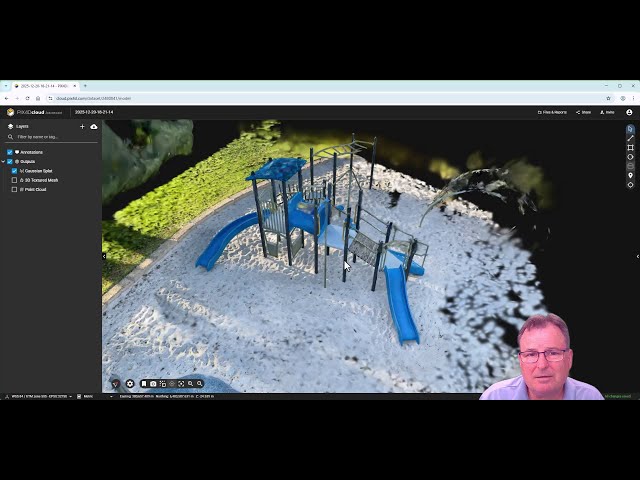
At the start of the year I wrote about capturing this same playground a very different way. I walked around it with PIX4D and took 691 photos, close up, into every nook and cranny. Then I compared three outputs: a point cloud, a photogrammetry mesh and a Gaussian splat.
The splat won that round easily. When it works, it’s stunningly real.
But it’s hit and miss. The point cloud is grainy. The photogrammetry mesh melts like cheese on the railings. Even the splat has floaters, stray smeared blobs wherever the camera coverage ran thin, and there’s a nice one over the roof of the tower. You need close, even coverage from every angle, or the result falls apart.
The bigger problem for me is what you end up with: millions of fuzzy ellipsoids, not objects. If you want to move a swing, you first have to work out which splats belong to it, and selecting and grouping splats is fiddly at best. There are no parts and no names to work with.
So this time I wanted to come at it from the other end.
Forty photos, not 691
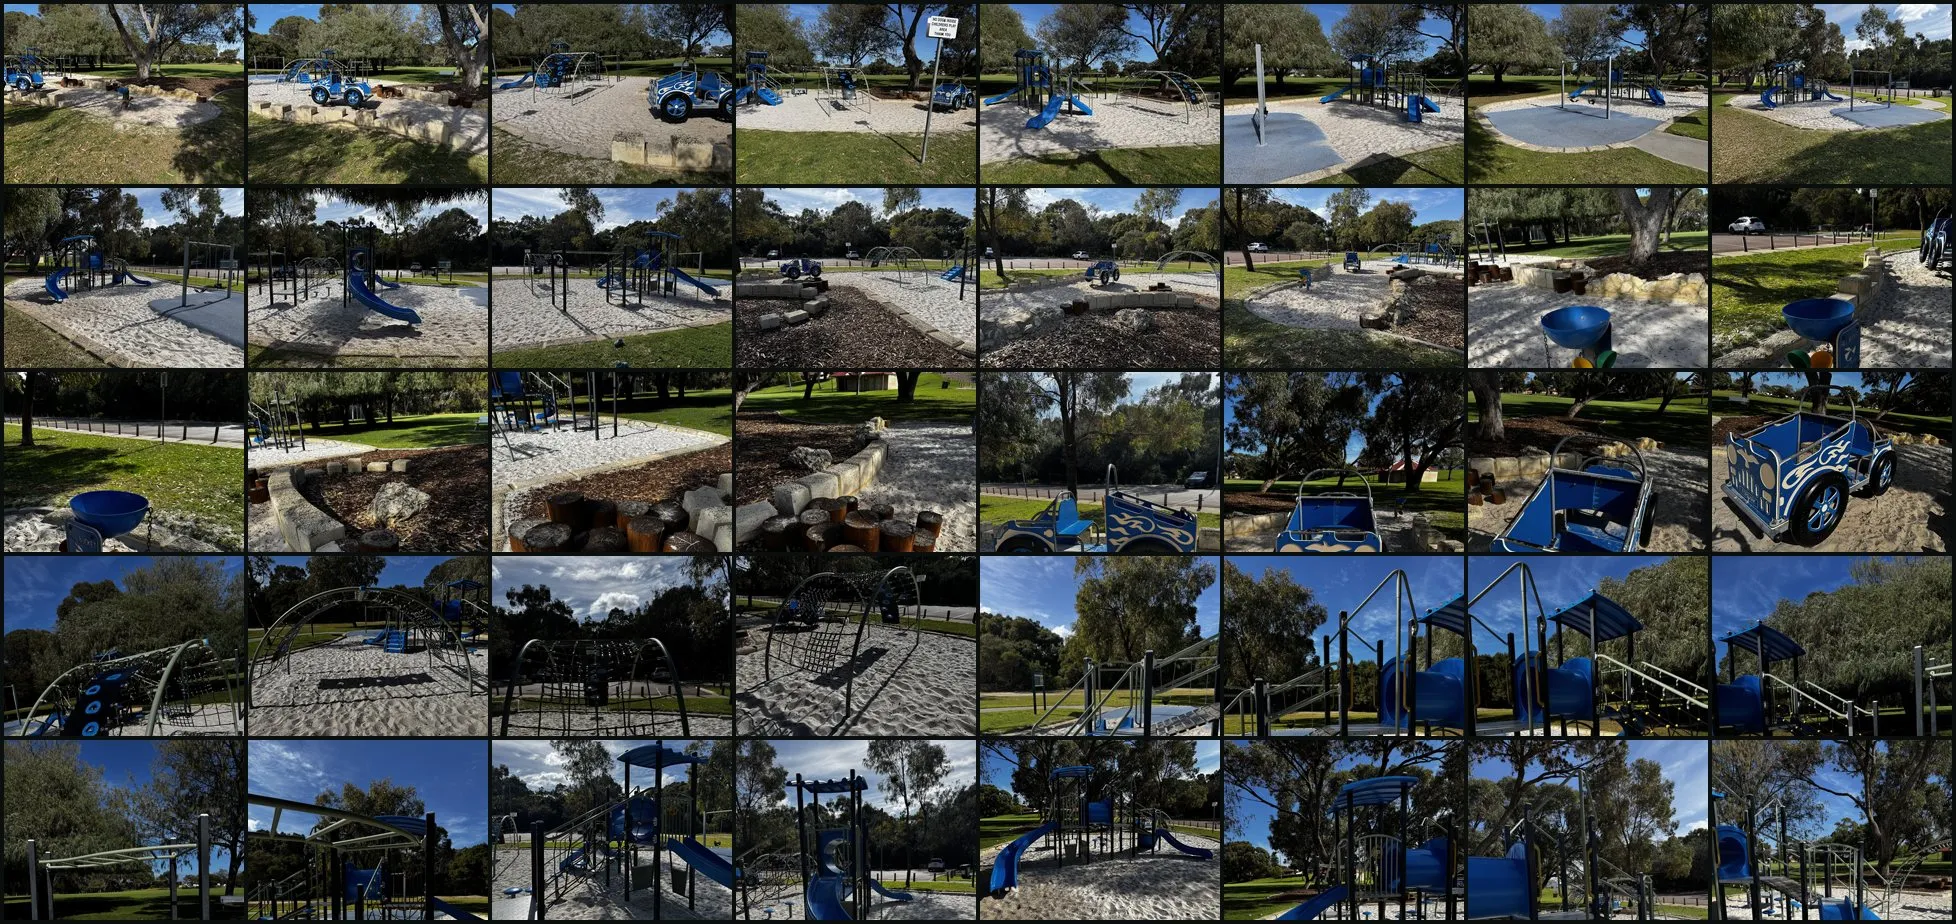
Six hundred close-ups felt like far too much detail to hand an AI agent, so I went back with my phone and took forty photos from further away. Most are from around the edge of the sand pit. The rest go around each major piece: the swings, the play tower with its slides, the dome climber and the little spring rocker car.
Same phone as in January, a lot less walking.
Setting up, then the brief
The brief I gave the agent was short, but only because most of the work had already gone in before I wrote it. That preparation is easy to skip over, and it’s the step that matters most.
First, the data has to be organised so the agent can find it and make sense of it. Then the agent needs the right tools within reach. Here that meant a way to write and build parametric CAD in TypeScript, a way to render the model from any camera position, and a way to lay those renders over my photos and see where they disagree. Without those, the agent is guessing, and a longer prompt won’t fix that.
Once the context is in order and the tools are available, the brief can be a single paragraph. Mine was: model the playground inside the sand area plus the limestone blocks around it, and ignore the grass and trees. Break it into a sensible hierarchy of named assemblies and parts. Texture it from what you can see in the photos. Light it with flat, diffuse light rather than reproducing the afternoon shadows. Export a GLB.
I also asked it to blur the number plates on any cars in the background, in case I wanted to post the photos later. Before touching any geometry, it went through every photo at full resolution and blurred 14 plates across 11 photos.
How the agent worked
I ran this in Claude Code. The agent worked in a loop, much like a person would:
- It estimated dimensions from the photos alone. I didn’t give it a single tape measurement, so it reckons absolute sizes are within about 5 to 10 percent.
- It wrote parametric CAD in TypeScript, one module per assembly. Posts, beams, rails, slides, chains and nets are all built from code with named parameters.
- For a dozen of the photos, it solved where my phone was standing and where it was pointing, then rendered the model from exactly that spot.
- It laid its renders over my photos, outlines on top, and looked at where they disagreed.
- Then it fixed things and went round again.
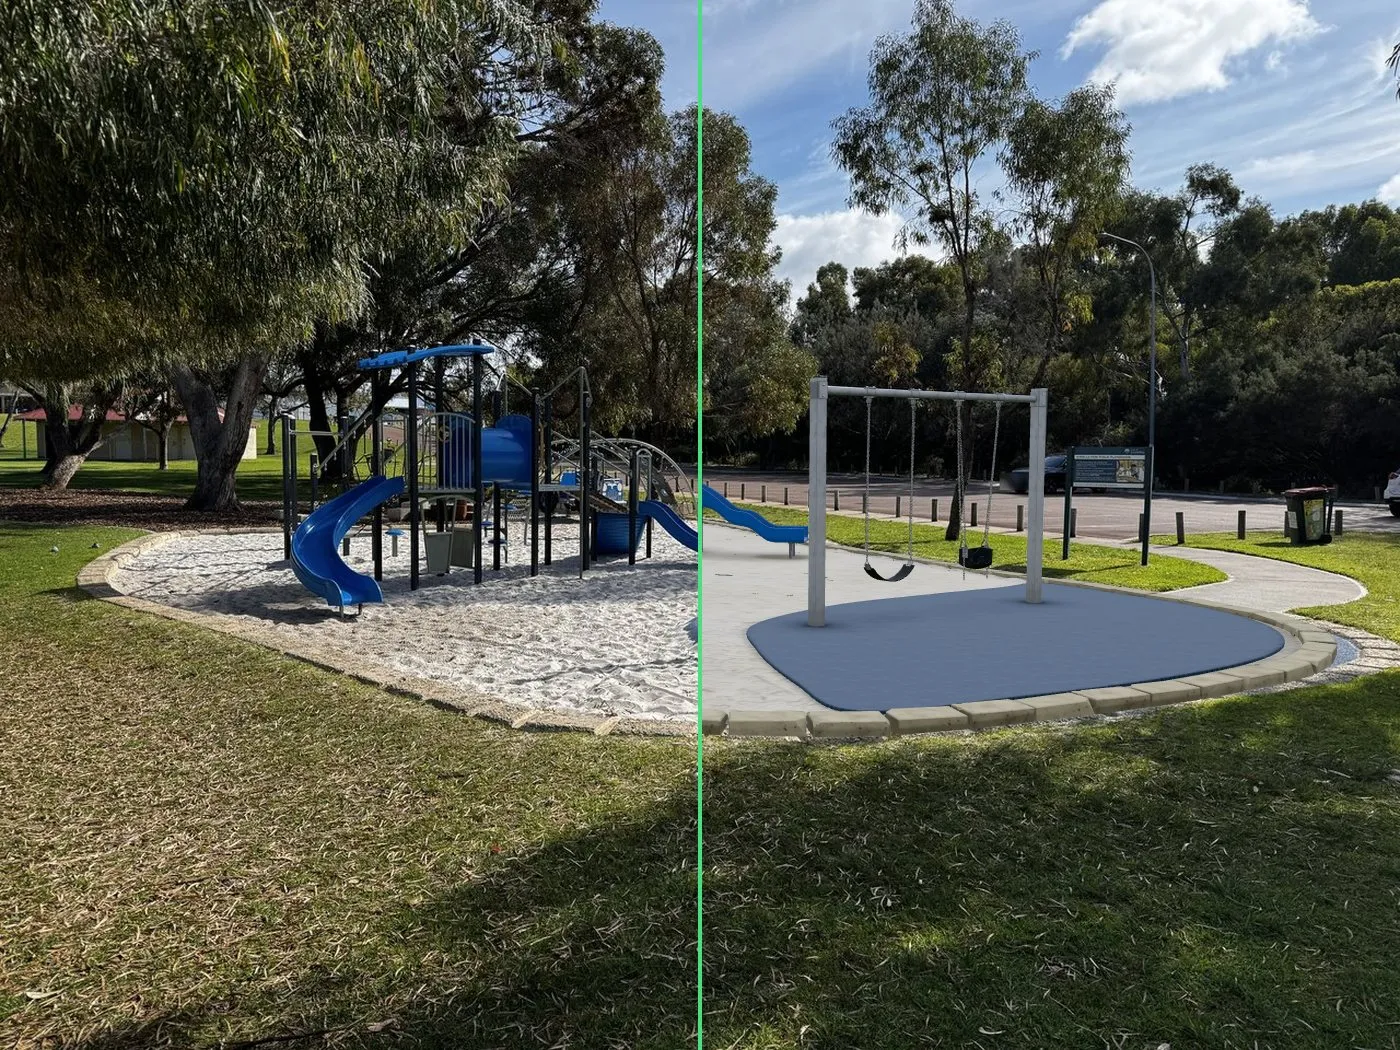
It also split the work up. The five main pieces of equipment (the tower, the swing set, the dome climber, the car and the water-play unit) went to five sub-agents working in parallel, each writing its own assembly.
The main agent then fitted the site layout to the twelve photo-matched cameras. It turned the tower ninety degrees, because the photos showed its front facing the swings. It also found the dome climber was 1.6 times bigger than first modelled, and it took the photo matching to catch that. The dome ended up with a 4.16 m span and a 2.1 m crown.
It’s the visual perception of today’s frontier models that makes this practical. Matching outlines against a photo is something you’d normally need a person for.
Later, when I asked it to double-check every comparison image, it tried a classic computer-vision score first, comparing detected edges between render and photo. That turned out to be useless, because sand is nothing but edges. So it went back to looking at the outline overlays itself, and that did the job.
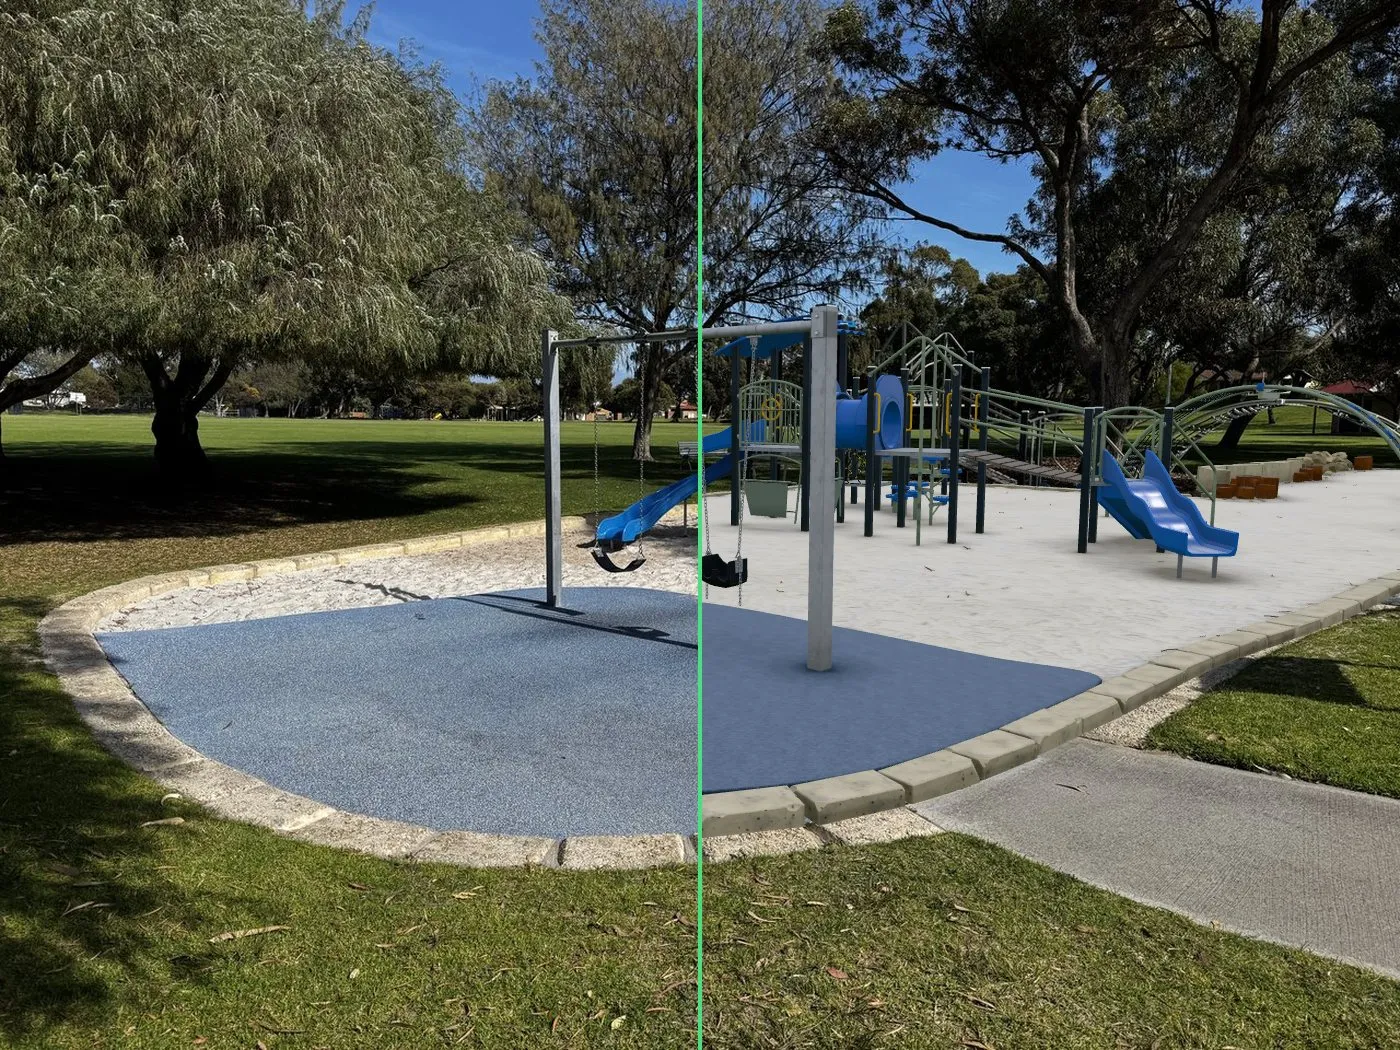
It isn’t perfect. This was a single iteration, and there are small offsets in a couple of views. The dome shifts a bit with parallax in one photo, and the camera estimate for another is slightly off. Nothing major, and I haven’t run a second iteration yet.
Pass one: accurate, clean, usable
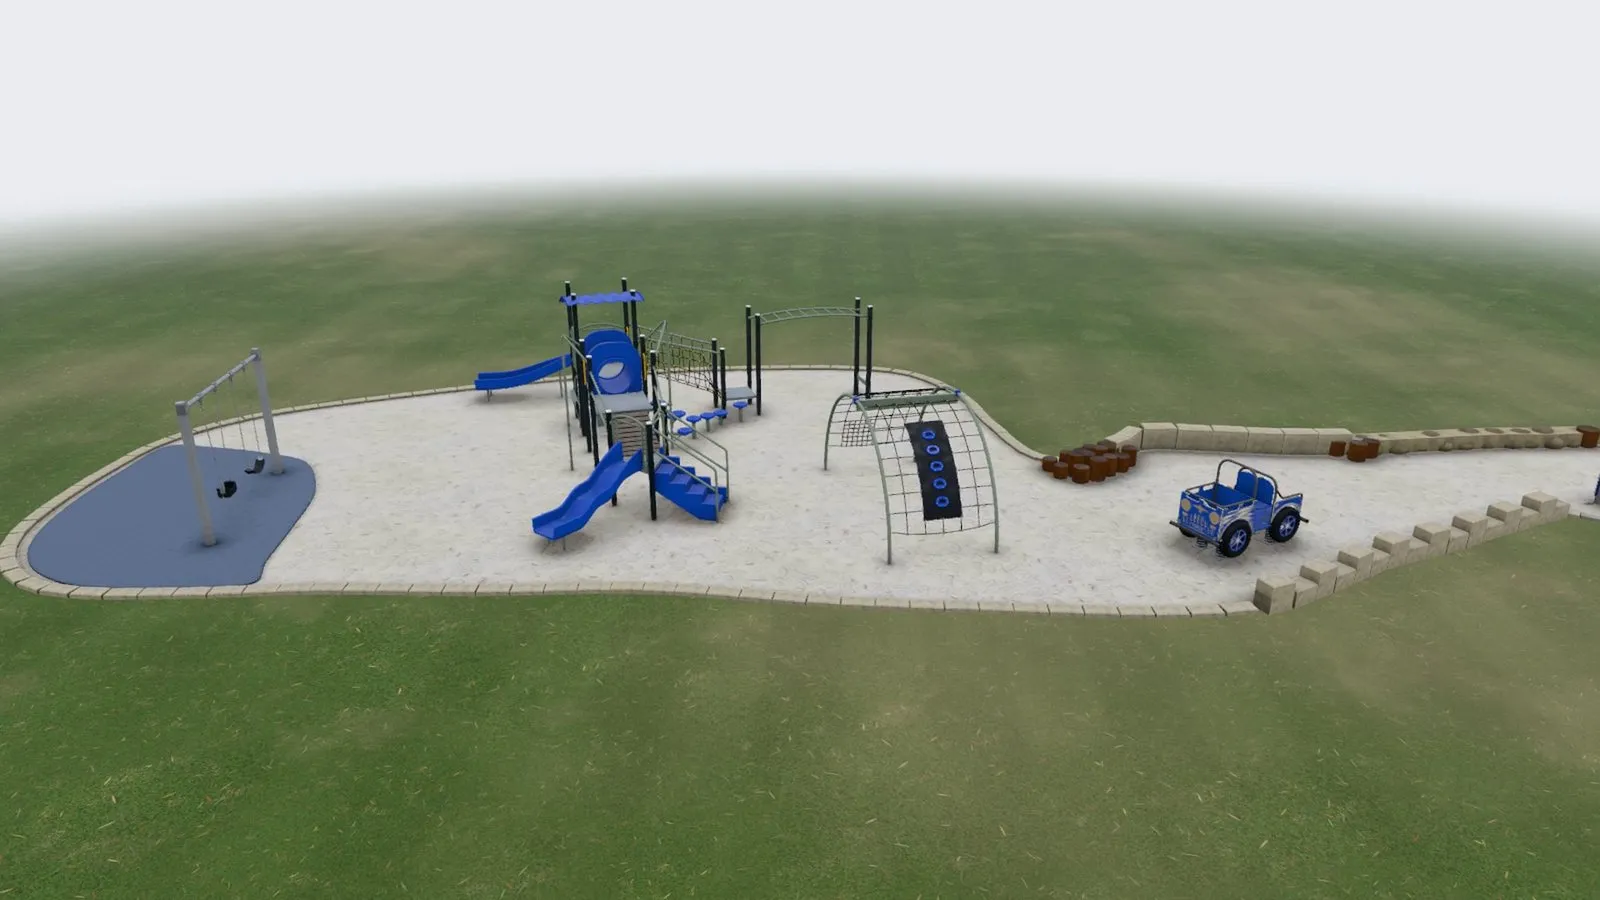
The first pass took about four and a half hours of agent time, start to finish. Late in that run I asked when the realistic texturing was coming, so it also matched material colours to the photos and baked in ambient occlusion and some weathering.
Honestly, it already looked pretty good. The proportions were right, the layout matched the photos, and it was clean, with no floaters and no melted railings.
Pass two: textures, and a reality check
I then asked for more realism, particularly up close. The agent pushed the procedural textures for the timber, galvanised steel, weathered limestone and plastic much further, with sharper bakes, edge wear and clearcoat on the plastics. It rounded the edges and added welds, washers and tyre tread to the equipment. It chipped the limestone blocks and scattered sand drifts and leaf litter. It also improved the viewer’s lighting and gave the playground a lawn to sit in.
All the textures are generated in code, with no photos pasted on.
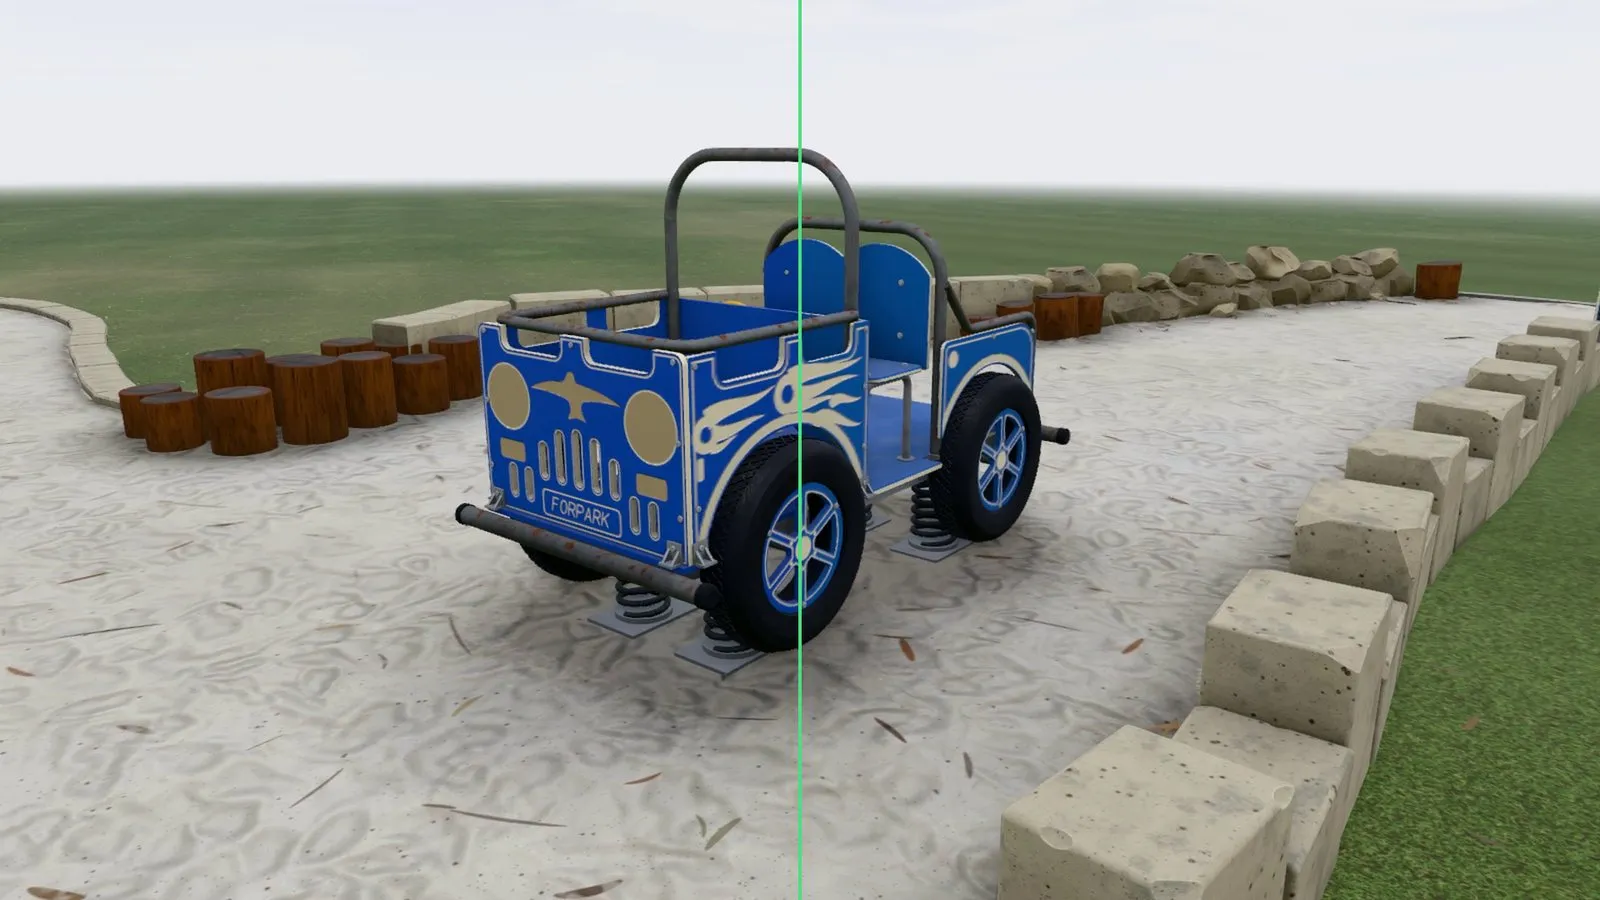
It helped a little, but not as much as I’d hoped. Put pass one and pass two side by side and the difference is there, but it’s small. The model still looks too clean. There’s more work to do there, but it isn’t the point of the exercise.
When I looked at the slides in the renders, they seemed too blue, almost violet. The agent measured it: the green-to-blue ratio of the slide plastic was about 0.43 in its renders against about 0.53 in my photos. The colour had been tuned to compensate for an older tone-mapping setting that had since changed. It fixed the colour in the model, re-rendered, and the slides came back to 0.52 to 0.55.
The point is the structure
The output is clean, usable, and you can drive it from code. That’s what I care about.
Each assembly is a node, broken down into named parts:
Playground                          1,500 parts
├─ Play Tower                       354
├─ Swing Set                        315
│  ├─ Frame                         13
│  ├─ Belt Swing                    139
│  │  ├─ Chain-1, Chain-2
│  │  └─ Belt Seat
│  └─ Cradle Swing                  163
├─ Dome Net Climber                 245
├─ Spring Rocker Car                90
└─ Water Play Unit, Timber Stumps, …
There are about 150 distinct part types behind those 1,500 parts, because repeated parts are instanced. All 268 chain links on the swings share one mesh, and the bolts, washers and stumps are instanced the same way. Instancing keeps the file size down.
Because the names mean something, you can add behaviour just by addressing the hierarchy. The swinging in the video is literally this, every frame:
swing("Belt Swing",   22 * sin(2πt / T))
swing("Cradle Swing", 14 * sin(2πt / T + 1.3))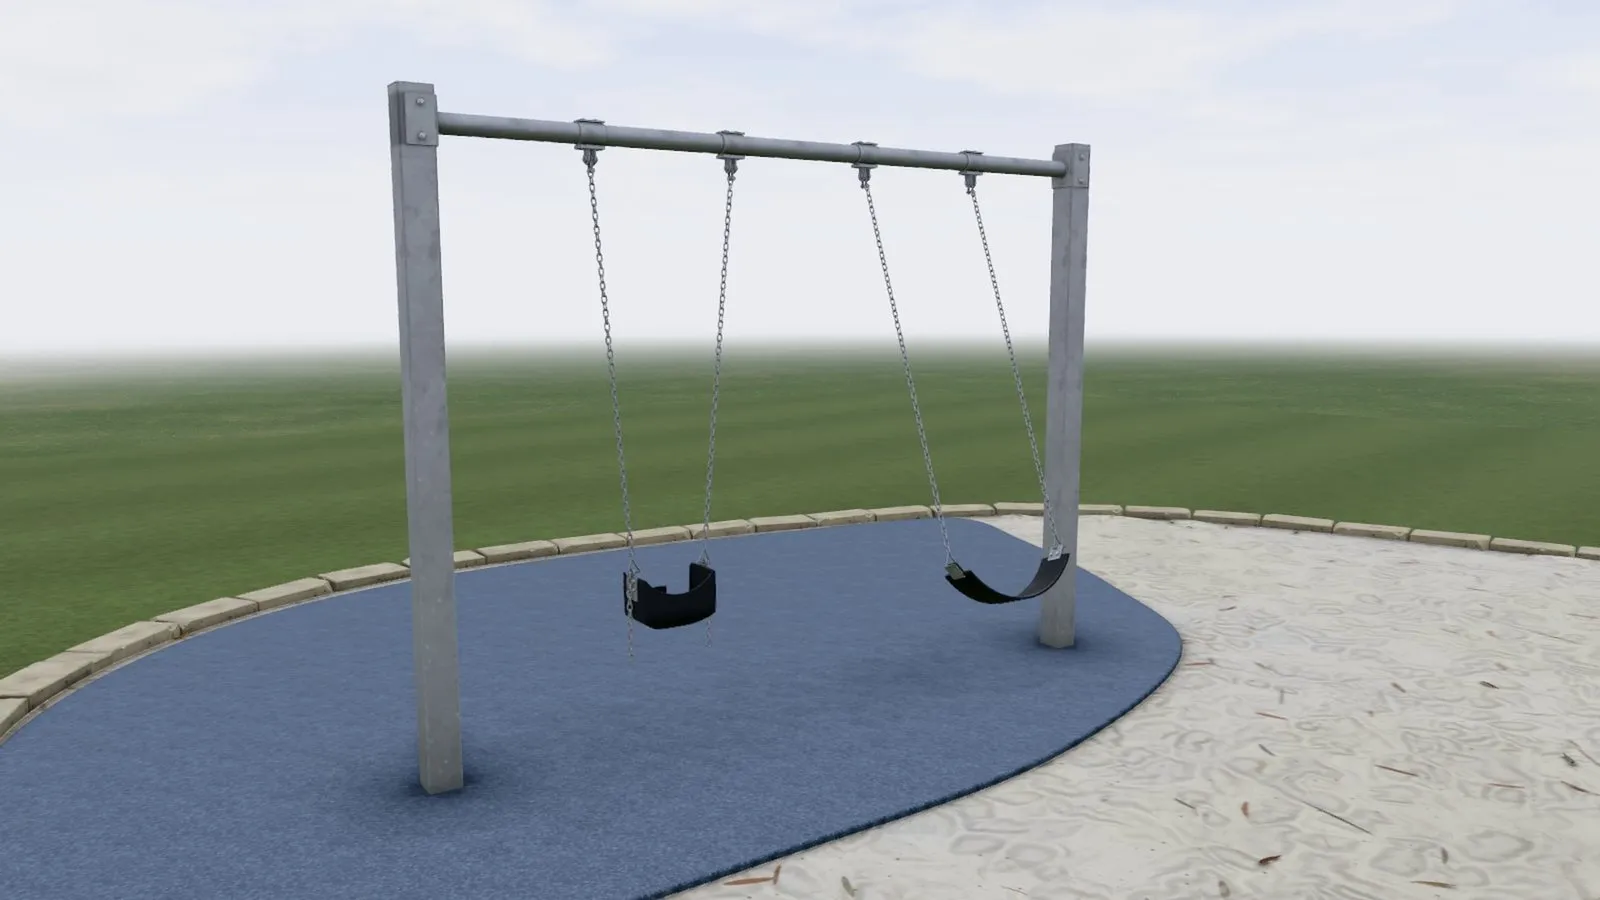
With a splat, you’d first have to lasso the right ellipsoids and hope you got the whole chain.
So which is better?
I lined up the splat and the CAD model from the same spots, with the camera matched by eye, to compare them fairly.
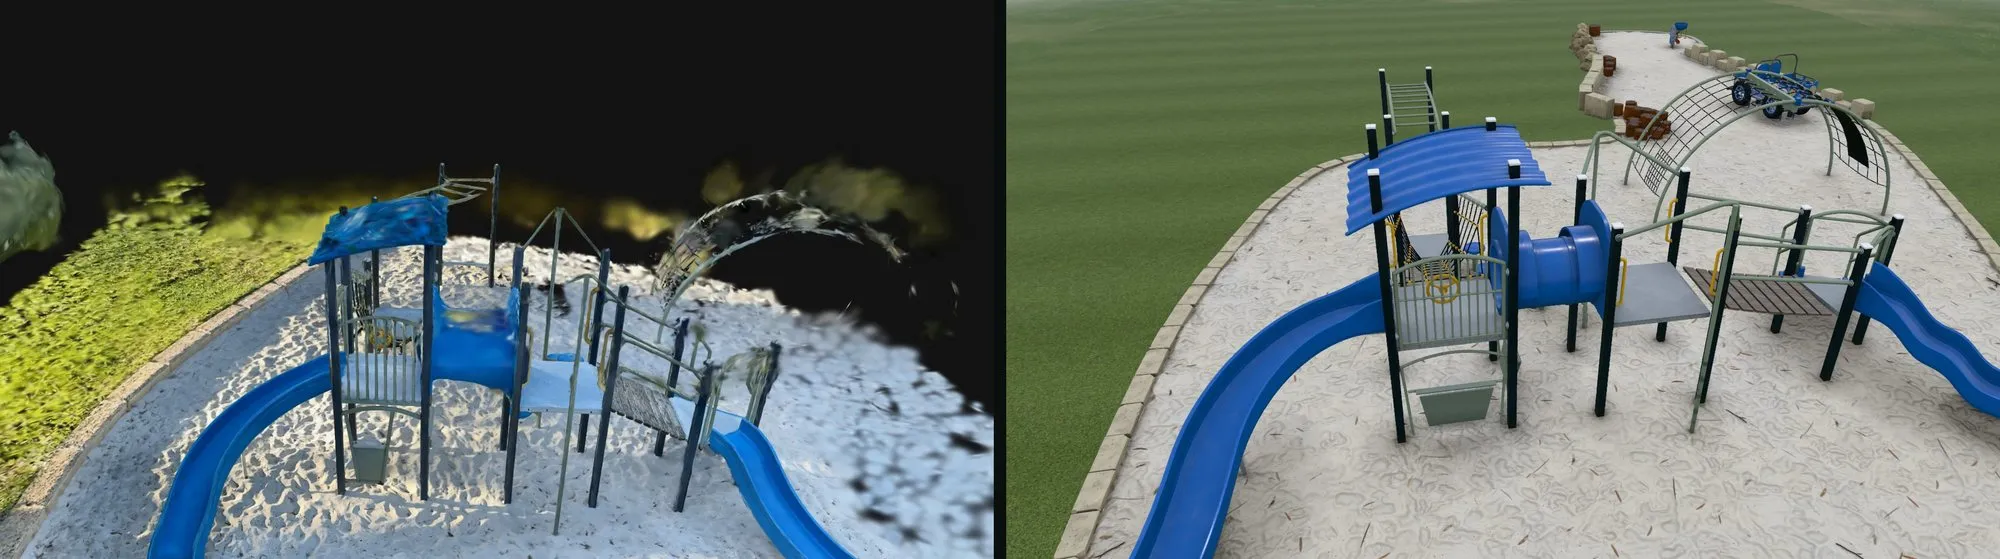
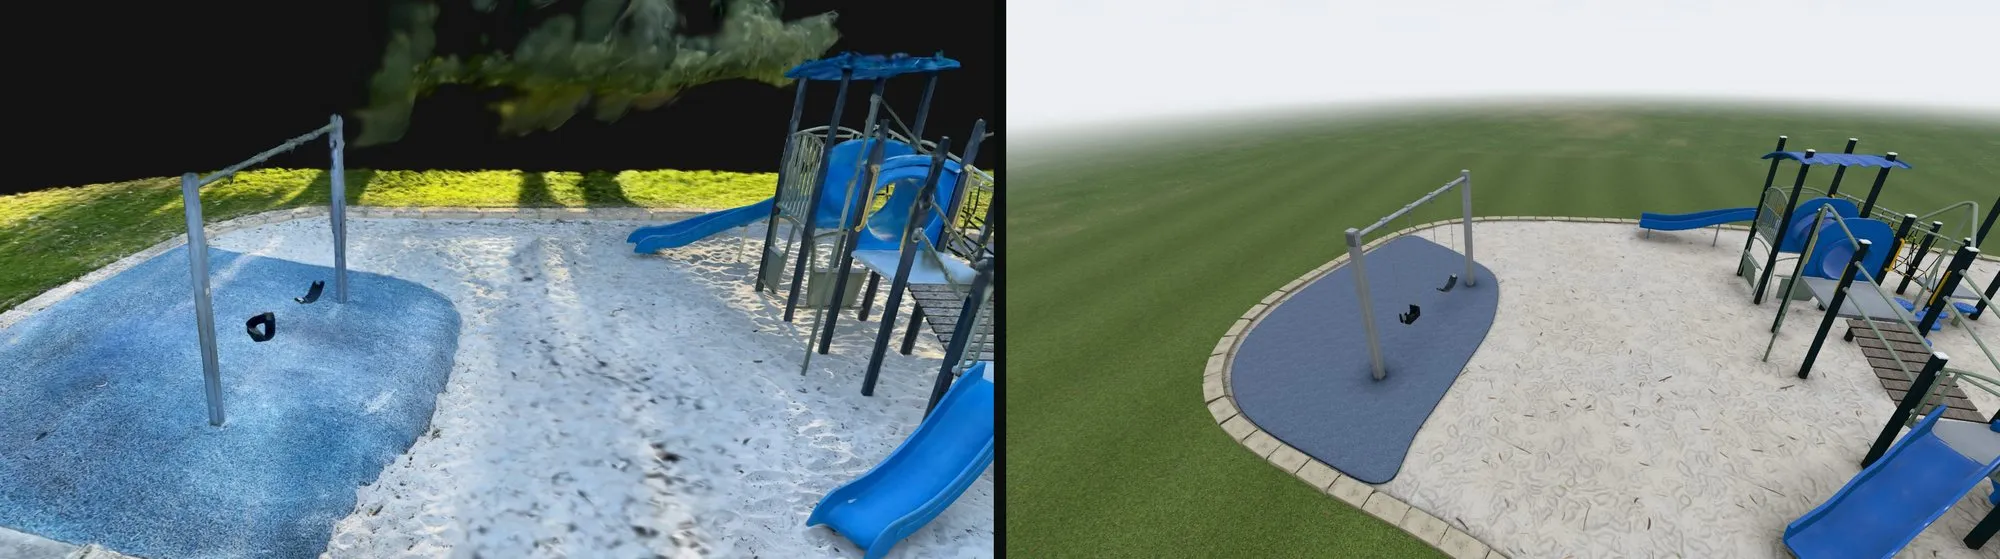
Honestly, the splat still looks more real, right up until you hit one of its artefacts. Then the illusion breaks pretty quickly.
| Gaussian splat | Agentic CAD | |
|---|---|---|
| Looks | The most photoreal | Clean, but still too clean |
| Artefacts | Floaters and smears | None to speak of |
| Capture | Hundreds of close-ups | Forty phone photos |
| What you get | Ellipsoids, no objects | Named hierarchy you can drive from code |
| Source | Trained radiance field | Parametric CAD |
Both have their place. If all you need is a beautiful flythrough, a splat is hard to beat. But a clean, structured model, generated by an agent from real-world photos, whether as parametric CAD or as a textured mesh, feels like an important direction for 3D content generation. I really like being able to get a mesh generated and textured from reality.
Where this can go
The playground is a toy example, literally. The interesting case is a facility.
Picture an agent walking through photos of a plant room or a processing line. It recognises the equipment, looks up the manufacturer’s designs for the pumps and conveyors and control cabinets, and fills in the internals that no camera will ever see. You’d get a structured model with the manufacturer’s parts and dimensions in it.
Cost at that scale is still a real question. For the record, I ran the whole experiment on Claude’s Max 20x plan (US$200 a month): the modelling, both passes, the lawn and the video. It used about 8% of my weekly allowance.
| Stage | Weekly allowance used | Same tokens at API prices |
|---|---|---|
| First pass | about 5% | about US$125 |
| Texture pass and lawn | about 2% | about US$50 |
| Video | about 1% | about US$25 |
| Total | about 8% | about US$200 |
Spread over a month, 8% of a week’s allowance works out to under US$4 of the subscription. Paying per token through the API, the same work would have cost around US$200. The ElevenLabs narration is extra, but small.
That’s fine for a playground. For a whole facility you’d want to think about it, but on a plan it’s a lot less scary than the API number suggests.
You’re no longer stuck with CAD models that are out of date, or that never existed in the first place. You can rebuild them from reality.
How the video was made
The agent built the video too. It wrote the script with me, cut the splat footage out of my old screen recordings from January, recorded flythroughs from the model viewer, and composed the whole thing as code with HyperFrames.
In my last post I used a generic Australian voice and said I might try a voice clone one day. This time the narration is my own ElevenLabs voice clone.
It does sound like me, but anyone who knows me would pick that it isn’t. It says “photo” in a strange way. Its pacing is probably better for most viewers than how I’d actually speak, too.
So it’s a mixed bag, but the trade works for me. The voice is recognisably mine, and I don’t have to record the audio, edit it and redo the fluffed lines. I’m not a voice talent, so I’ll keep using a voice clone for this sort of presentation.
That post also had the odd glitch at the end of a phrase, where the audio edits clipped the tail of a breath. This time every narration clip plays out in full, and each scene is sized around its clip rather than the other way round.
When I spotted a comparison slide that didn’t quite line up, the agent went back and checked every comparison against the photos before finalising anything. I also asked for the realism pass to be played down in the final cut. It’s still in there, but briefly, and the video leads with the structure.
Get in touch
I’m in my fifth decade of crafting software, and I’m available for agentic software development and architecture work. If this sparks an idea for your own project, get in touch.